As you probably know the slice tool is one of the more useful and frustrating tools available in Cricut’s Design Space software.
If you aren’t familiar with it, I’ll explain exactly what it does and why it’s essential you know how to use it.
In this tutorial, I’ll walk you through how to master the slice tool while avoiding the most common issues. If you have never used it before it’s going to open up a whole new world of possibilities!
This tutorial is part 1 of 5 on the most important tools in Design Space.
At the end of this tutorial, you’ll know how to slice on a Cricut machine using Design Space.
Table of Contents
How to Slice in Cricut Design Space
Learning how to Slice in Cricut Design Space is actually a great first step for a beginner, and if you’ve gone a while without having to do it, well… it’s time!
We’re going to cover what the Slice function does, give a tutorial that will teach you to cut overlapping shapes, and talk about both what Slice creates and how it generates cut paths.
At the end we have our eight expert tips and we’ll answer the questions we hear the most.
If this sounds tricky, don’t worry. It’s really easy!
What is the slice tool?
The slice tool allows you to split overlapping shapes, text, or two overlapping images into different parts. By cutting a shape or text out of another shape, you can create intricate designs and achieve a professional finish on your projects.
The slice tool provides two basic functions:
- Trimming off part of a shape
- Cutting out a shape or text from another shape
The more common of these two functions is cutting out a shape. I’ll go over exactly how to do this, step-by-step in a moment. But first a little peak behind the scenes so we know what’s happening when we click slice in Cricut Design Space.
What slicing does in Cricut Design Space
Okay, so what is actually happening in Cricut Design Space when you use the slice function?
The slice tool splits parts of one image from another. When you use the slice tool on two overlapping images, it creates new cut paths wherever the edges of the images intersect. This process results in several new shapes, each representing the different sections of the original images.
The slice tool essentially divides the overlapping areas, giving you the power to manipulate the newly created shapes individually and customize your design further.
Think of it as holding a cookie cutter over the dough and pressing the desired design in. You’re left not only with the cut-out cookie but also the negative space where that cookie used to be in the flattened dough.
The magic doesn’t stop there! The slice tool breathes new life into the original shapes by transforming them into completely unique creations. You’ll find each of these newly formed shapes in the Layers panel, neatly organized as each individual layers.
Why slice?
Slicing in Cricut Design Space opens up a world of possibilities for your crafting projects. Imagine being able to create custom shapes or text by removing parts of an image, combining overlapping images, or to cut overlapping shapes.
The slice tool is like having a magical pair of scissors that can transform ordinary designs into extraordinary ones! Plus, you can combine multiple images or text into a single, cohesive design, making your work truly unique and eye-catching.
But that’s not all!
When you use the slice tool you also simplify complex designs by breaking them down into manageable pieces, making it easier for your Cricut machine to cut them. This nifty feature is also a time and material saver, as you can cut multiple shapes from a single piece of material, like vinyl or cardstock. This not only speeds up your crafting process but also ensures that you make the most of your materials.
How to use the slice tool in Cricut Design Space
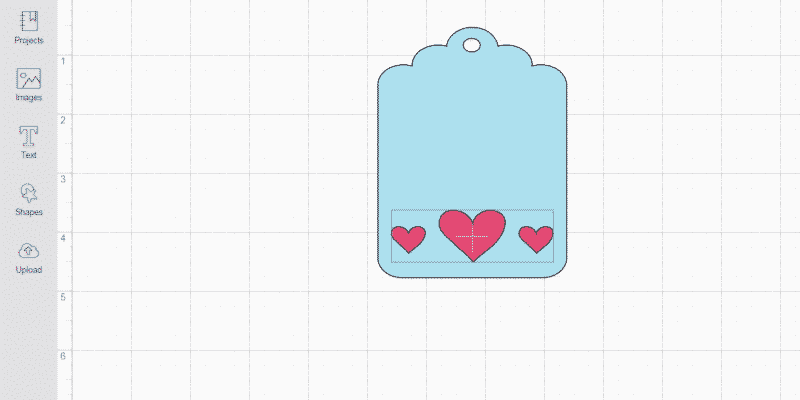
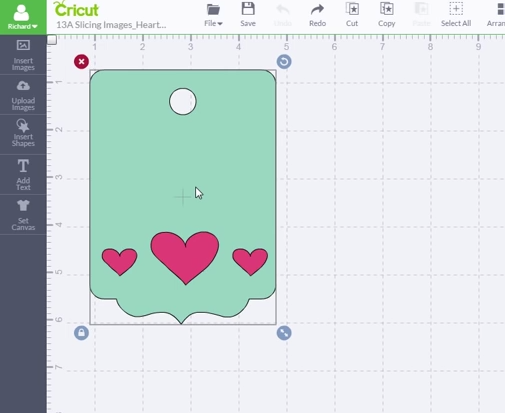
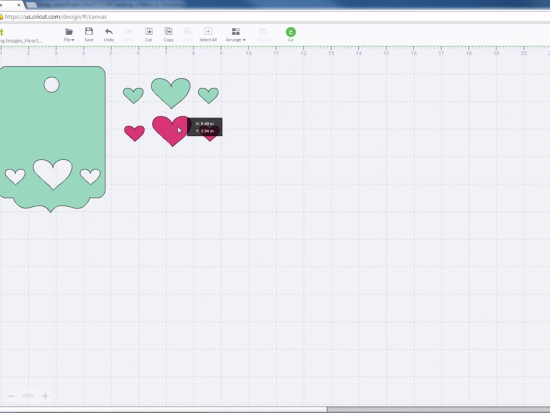
Using the slice tool in Cricut Design Space is like a fun game of puzzle-solving. Start by arranging your images so that they overlap. While holding the shift key on your keyboard, click on each layer, and a box will appear around both images.
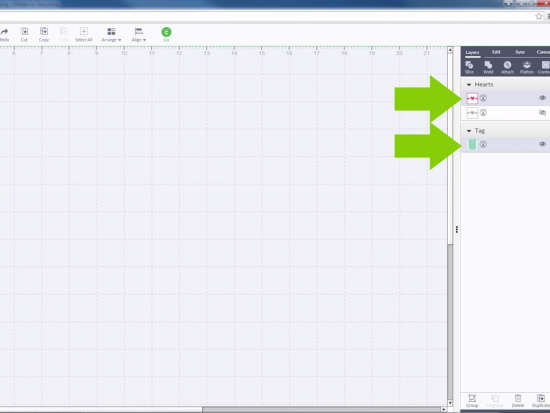
Next, head over to the layers panel on the right and select both the images you want to slice.
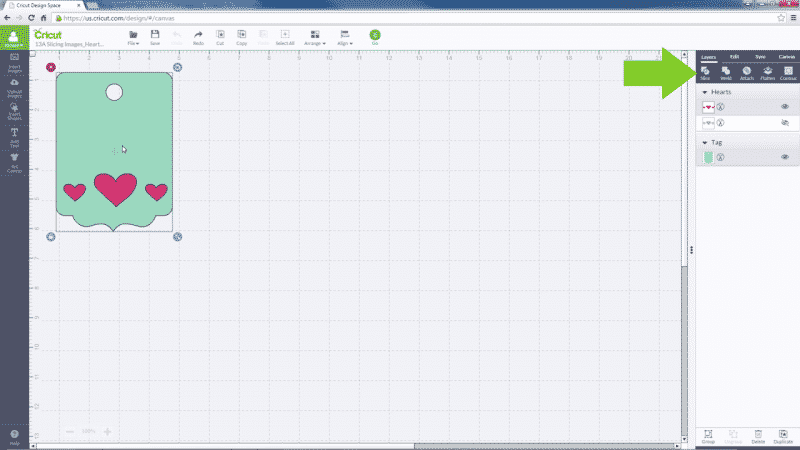
Once you’ve done that, it’s time for the big reveal! Click the slice button, and watch as the new images appear in the layers panel, with any hidden layers automatically removed.
Now you can click on the freshly sliced images, move and separate them as needed, and even delete the ones you don’t need anymore.
(It’s like weeding vinyl but… easier.)
And just like that, you’ve successfully used the slice tool in Cricut Design Space!
Let’s do this step-by-step now, with images:
How to use the slice tool in Cricut Design Space
- Arrange your images so they overlap. Hold the shift key on your keyboard while clicking on each layer. A box will appear around both images.

- Select the images in the layers panel on the right.

- Click slice. The new images will appear in the layers panel and any hidden layers will be removed.

- Click on the newly sliced images to move and separate them. Delete them if you no longer need them.

Tips for using the slice tool
Tip 1: Tackle two layers at a time
When you use the slice tool, remember that it’s designed to work with only two layers simultaneously. If your project has more than two layers, you’ll need to slice them in pairs. Think of it like slicing a cake: you wouldn’t try to cut all the pieces at once, right?
… right?
Tip 2: Weld your way through complex designs
If you’re working with a complex design that has multiple overlapping images, don’t fret! Use the Weld tool to fuse them into a single layer before slicing. This handy trick will make the slicing process much smoother and help you achieve the desired results.
Tip 3: Keep it simple with basic shapes
When you’re just starting out with the slice tool, it’s a great idea to use basic shapes like squares, circles, or triangles for easy slicing. By sticking to simpler shapes, you’ll quickly create custom designs while getting a feel for how the tool works. Once you’re comfortable, you can move on to more intricate designs.
Tip 4: Don’t play hide and seek with layers
Before you start slicing, make sure both layers are visible in the layers panel. Hidden layers won’t be included in the slicing process, and you might end up wondering where it went! Double-check your layers to avoid any surprises.
Tip 5: Contour your way to perfection
Want even more control over your designs? Use the “Contour” tool to remove or add specific areas to your sliced images. This feature is like a fine-tuning knob that lets you create the perfect design with precision and ease.
Tip 6: Peek before you cut
It’s always a good idea to preview your design in the “Cut” screen before sending it to your Cricut machine. A quick check ensures that all elements are aligned and properly sliced, preventing any mishaps or disappointments.
Tip 7: Practice, practice, practice
Slicing can be a bit tricky at first, but don’t worry! Just like any other skill, practice makes perfect. Start with simple shapes and designs to build your slicing prowess and gain confidence. Before you know it, you’ll be a slicing pro!
Tip 8: Organization is key
An organized workspace is a happy workspace! Keep your project neat and tidy by renaming and labeling your layers. This will make it much easier to find specific layers and ensure that your slicing adventure remains a breeze.
FAQ
Where can I find cut/slice images?
I recently updated (March 2023) my collection of over 15,000 free SVG files for Cricut machines. Check it out!
Why won’t the slice tool work?
There could be a few reasons you’re unable to Slice in Cricut Design Space.
- You’re trying to slice more than two layers at once. Make sure you’re only slicing two 1-layer images. If either image has multiple layers, make sure to ungroup them or delete before slicing.
- One or both layers have multiple layers within them. Ensure that both layers are single-layer images before slicing. If necessary, use the “Ungroup” or “Flatten” functions to separate or combine layers.
- One or both layers are hidden in the layers panel. The slice tool won’t work on hidden layers, so double-check to make sure both layers are visible before attempting to slice.
- You haven’t selected both layers. To use the slice tool, you need to select both layers by holding the shift key on your keyboard while clicking on each layer.
Why is the slice button greyed out?
A few possibilities:
- You haven’t selected any layers, or you’ve selected only one layer. To use the slice tool, make sure to select two layers by holding the shift key on your keyboard while clicking on each layer.
- You’ve selected more than two layers. The slice tool works with only two layers at a time, so if you’ve accidentally selected more, the button will remain greyed out. Deselect any additional layers and try again.
- One or both of the layers you’ve selected have multiple layers within them. In this case, you’ll need to ungroup, flatten, or delete any extra layers before attempting to slice.
How can I select a multiple image layers?
To select multiple image layers in Cricut Design Space, follow these steps:
- Click on the first layer you want to select in the layers panel or directly on the canvas.
- Hold the shift key on your keyboard.
- While holding the shift key, click on each additional layer you want to select, either in the layers panel or on the canvas.
- Release the shift key once you’ve selected all the desired layers.
You should now see all the selected layers highlighted in the layers panel or surrounded by a bounding box on the canvas.
Working with three or more layers?
While the slice tool only works with two layers at a time, you can still work with projects that have three or more layers. In such cases, you’ll need to slice the layers in pairs. Start by selecting the first two layers you want to slice, and then use the slice tool.
Once you have the desired result, repeat the process with the next layer and the newly sliced image. Continue this process until you’ve sliced all the necessary layers.
How can I view hidden layers?
Hidden image layers won’t be included in the slicing process, so it’s essential to ensure all layers you want to slice are visible. To see hidden layers, look for the “eye” icon next to the layer thumbnail in the layers panel. If the eye icon has a slash through it, the layer is hidden. To unhide the layer, simply click on the eye icon, and the layer will become visible on your canvas.
Why does Slice add many layers?
The slice tool adds multiple layers because it creates new cut paths and shapes based on the overlapping portions of the two layers you’re slicing. Each new shape generated by the slice tool becomes a separate layer in your project, providing you with individual elements to work with.
For example, if you slice a circle and a square that overlap, the slice tool will create three new layers: one for the circle with a square-shaped hole, one for the square with a circular hole, and one for the overlapping portion.
The reason for this is to give you maximum control over the new shapes, allowing you to move, edit, or delete them independently. This flexibility lets you fine-tune your designs and make the most of the slice tool’s capabilities.
When you use the slice tool on two overlapping images, it creates several new layers based on the overlapping portions of the images. Each new layer represents a distinct shape, giving you individual elements to work with in your design.
What other menus are needed to Slice in Cricut Design Space?
There’s also a shapes menu (or shapes toolbar) that contains a variety of basic shapes such as squares, circles, triangles, and more. These shapes serve as the building blocks for countless creative projects. You can easily access the shapes menu by clicking on the “Shapes” icon on the left-hand toolbar.
From there, simply select the shape you’d like to make use slice for, and it will appear on your canvas. You can then resize, rotate, or modify the shape to suit your needs. Combining basic shapes with the slice feature opens up a world of possibilities for designing unique and intricate projects.


