
If you’re having trouble weeding vinyl decals, you are not alone.
If you have no idea what weeding even has to do with cutting vinyl, or why your Cricut came with a weeding tool, I’m here to explain!
I’ll cover what weeding is, and give you the very basics of how to weed vinyl effectively so that you don’t waste any material.
Then I’ll go over the best tools for the job as well as my favorite types of vinyl for different applications. I’ll talk about how to find easy fonts to weed, and then move onto working with tricky scripts or small lettering & words.
At the end, I’ll share the tips and tricks that I’ve accumulated over the years, and put together just for you!
Table of Contents
What is Weeding Vinyl?
Weeding vinyl is the process of removing the unwanted vinyl from your cut design. You can think of it like weeding a garden: you carefully dig up all the little pieces that aren’t supposed to be there, without destroying any of your beautiful flowers.
Weeding is actually one of my favorite parts of cutting vinyl…but I’ve been told that probably makes me officially insane.
I love the big reveal: when my design transforms from blank squares and unformed blobs to fully realized art.
But many find that removing all the tiny pieces from detailed, intricate designs is a bit tedious, so I’m here to help make weeding vinyl easy!
(But no, I won’t weed your pieces for you.)
Onto the tutorial! I’ll be cutting my vinyl with a Cricut Maker (more details here), but any machine will work.
The Basics of How To Weed Vinyl
Okay, so how do you actually weed vinyl?
After your design is cut, but before you transfer your design, you have to remove all the unwanted vinyl from the backing sheet.
(If you’re having trouble cutting the vinyl itself, you read my vinyl cutting machine review here)
We usually begin from the outside and work in: start with removing the largest pieces surrounding your design, and attack all the centers and holes after. This makes it easier to see your design and find all the pieces to remove.
- First, carefully peel off the big pieces of vinyl surrounding your design. For small designs, you can do this in one go. For large or intricate designs, it helps to work in smaller sections, and cut off the excess vinyl as you go. Start at a corner, and slowly pull the excess vinyl up at an angle, making sure all the parts of your design remain attached to the carrier sheet. If you notice part of your design lifting up, you can just hold it down with your finger while you pull off the vinyl surrounding it.

- Next, go through with your tool of choice, and remove all remaining unwanted pieces of. Simply dig the point of your tool into a corner the piece to be removed, and lift it away. Look for the centers of letters like “a” and “e” and any interiors of objects.

- That’s it! Now you are ready to transfer your vinyl!

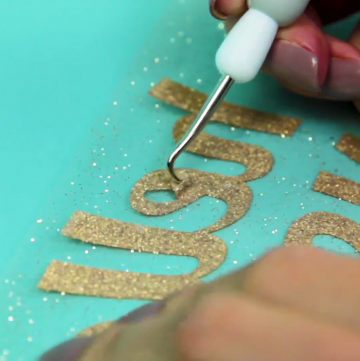
It may take a few tries to weed your design correctly, and that is okay! Some types of material can get a little pricey, especially things like glitter vinyl, which also seem to be the most difficult to weed. Just be patient, and make sure your cuts are going all the way through your material.
Here’s a really great step-by-step visual guide for how it’s done!
For tricky designs and heat transfer vinyl, I actually prefer to work from the inside out: start with the centers and intricate areas, and save pulling off the large outer pieces for last. I usually do the hardest part first, so if I mess up it’s less work that I have to redo.
This method also leaves the whole sticky backing from HTV exposed for less time, so your weed scraps don’t get stuck to it and accidentally transferred to your t-shirt.
Okay, let’s go through some of the best tools for the job.
I’ll follow that up with some tips for fonts and small lettering. If you want to skip straight to all my tips & tricks, you can find them at the bottom of the page. (There are a ton of them!)
What Are the Best Tools for Weeding Vinyl?

Wondering which tool is best for weeding? Well, there’s no easy answer: everyone has their own favorite. I recommend trying out a few of these tools, and figuring out what works for you.
Weeding tool
My favorite is the tool named for the job. It’s shaped like a pen, with a curved metal pick at the end that can easily get bits of vinyl. A weeding hook comes included with the Cricut Basic Tool Set and the Silhouette Cameo Tool Kit.
X-Acto knife
You’ve probably already got one of these lying around. The point can pick up vinyl, and the sharp edge is useful if there are any incomplete cuts that you need to slice through. Easy to change out the blade if it gets dull.
Straight pins
These are super cheap! The tiny tip is perfect for tiny bits of vinyl, but they’re not very sturdy.
Tweezers
Essential for grabbing tiny pieces of vinyl that won’t cooperate with your sharp tool.
Reverse tweezers
These tweezers open when you squeeze them, and then clamp closed when you release, so you don’t have to keep squeezing to hold something in place. Super useful, and comes included with the Cricut Basic Tool Set.
Dentist pick
Yep, this is actually the perfect shape for weeding adhesive vinyl. (Personally, I just can’t handle it.) Usually double-sided, with a curved end and an angled end.
Which Vinyl is Easiest to Weed?
I go into full details about this in another post, but I’ll provide a quick overview below:
Removable
For removable adhesive vinyl, your best bet is Oracal 631, which is similar to the Cricut vinyl. It is matte, removable, and great for wall decals. It cuts and weeds cleanly.
It’s best used with high tack paper transfer tape, which is like super wide masking tape. My recommendation is Oratape HT55.
Permanent
My preferred permanent vinyl is Oracal 651. This is glossy, permanent, and great for anything that is going to get washed or exposed to weather: car decals, mugs, glasses, etc. Cuts and weeds reliably like the 631.
It should be used with medium tack transfer tape, like RTape medium tack AT65.
Heat Transfer (Iron-On)
The easiest heat transfer vinyl to use is Siser EasyWeed Heat Transfer Vinyl. Believe it or not, it is easy to weed! This comes on a clear adhesive backing, and is for ironing vinyl on to fabric for shirts, bags, hats, etc.
If you have a favorite type of vinyl, let me know what it is, and why you like it! I have heard some good things about Vinyl Ease, but I don’t have a lot of experience with it.
Which Fonts Are Best for Easy Weeding?
To help with picking out a font, you can use wordmark.it to look at your desired text with all the different fonts available on your computer. Seriously, it’s great and you should try it out! Remember: you can use all the fonts on your computer with Cricut Design Space or Silhouette Studio.
The fonts that are easiest to weed will have clean, thick lines, without any extra little swirls or doodads.
Stencil fonts are really quick to weed because you don’t even have to pop out the centers of letters!
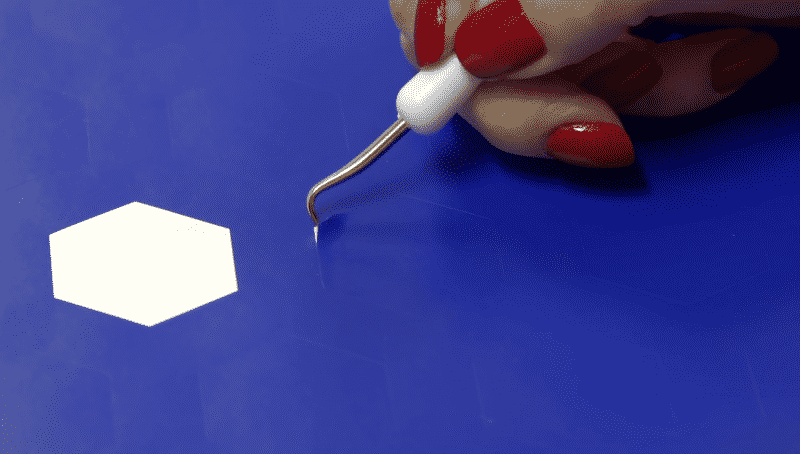
Sans serif fonts (like Arial or Helvetica) will generally be easier than their serif alternative. Serifs are the little pointy flags at the top and bottom of letters, like the red parts here:

Serifs have a tendency to catch a bit when you try to remove the vinyl around them. Sans serif lettering also has even width, while serif lettering has thick and thin strokes that are more difficult to weed around.
For easy weeding, avoid script fonts that have long, thin swirls. They certainly look beautiful, but will take a long time and may take a couple of tries. These fonts take a lot of patience, some practice, and a careful hand. Once you get the hang of weeding, you can tackle this batch 10 script fonts perfect for cutting by Kimber.
Avoid fonts that have textures or brush strokes, or ones that look “distressed.” You want clean lines around your letters for easy weeding. These ones can be a bit of a nightmare!

If you are attempting a fancy script or a distressed font, you should absolutely try out some of the advice I give in the next section on tiny letters.
Help! How Do I Weed Small Vinyl Lettering?
Oh boy, weeding tiny letters sure can be an arduous task. Sometimes when you pull up the vinyl you’ll lose dots and commas, or even entire letters!
First of all, go SLOWLY and make sure you have lots of bright light so you can see your cuts. (More on this in the tips + tricks section!)
It’s generally easier to remove vinyl from delicate lettering when there is less material to remove.
- Weed cuts. Also known as weeding lines. These lines help break up the large pieces of negative space around your design, so they are easier to remove without losing pieces of your design or accidentally resticking the vinyl to itself. You can add these in the design stage as extra cut lines that go from your design to the edge of the vinyl. Or, after your design is machine cut, you can take an X-Acto knife or craft knife and hand cut weeding lines around your lettering.
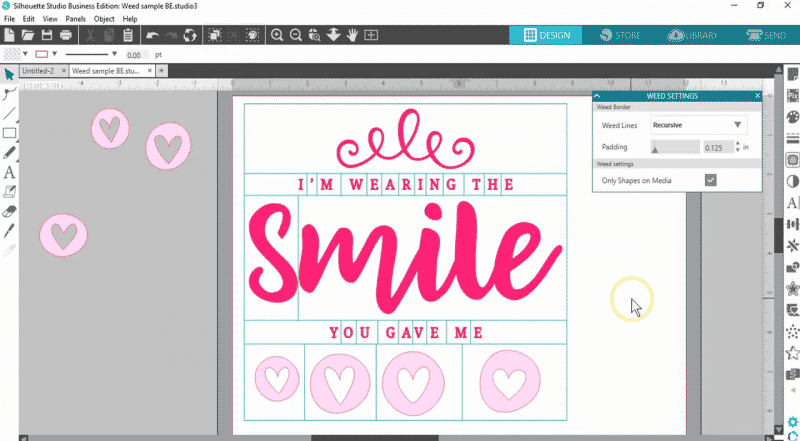
- Use a weeding box. Cut a box around each word or letter so that you can work on pulling up one section of vinyl at a time. Like weeding lines, you can add a weeding box in the design stage by simply placing a square border close around the outside of each part of your design. Or just do it by hand with a craft knife. Make sure it’s the same color as your design, so it gets cut at the same time. Check out Siser’s tips on how to make this weed box for Cricut or Silhouette.
- Here’s a picture of how it can be done automatically in Silhouette Studio Business Edition. The light blue lines around each letter are the weeding lines, or weed boxes:

You can adjust the character spacing in your design program. So if you are having trouble weeding some lettering, you can move the individual letters farther apart so they are easier to work around.
Make sure that any overlapping text is “welded” together in your design program so that cursive script is cut with a single continuous cut.
Okay, and now for the most useful tip. This mysterious product is great for taking out the centers of A’s and O’s, and for all the little pieces of distressed fonts…
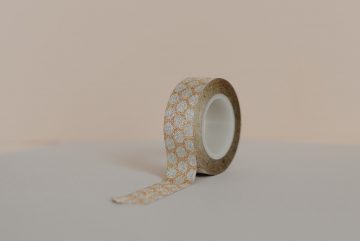
Washi tape! Low tack tape, like washi tape, can be used to pull off tiny bits of vinyl that don’t belong on a cutting mat. It’s best to first make the tape even less sticky by pressing it against your hand or shirt a few times. Then dab it up and down against the tricky parts of your lettering to remove tiny bits, like from a distressed font or the centers or the centers of small lettering.
If you’re really having a hard time, it’s time to break out the light box and a straight pin. You’ll want to take your time, really paying attention to the cut lines. If you don’t have a light box you’ll just want plenty of good light. Cricut does have a light pad called the BrightPad, so check this out too!
Alright, make sure to go through the rest of the tips + tricks below!
15 Tips & Tricks for weeding vinyl
- Don’t go too fast; take your time. In fact, go slowly. (The Hanging Gardens of Babylon weren’t weeded in a day.)
- Get a good light. If you can’t see your cuts you can’t weed your vinyl! Some people like an overhead light, some people need a light raking in from the side to expose the cuts.
- With a light box, like the Cricut BrightPad, you place your cut vinyl on top of a brightly lit surface. The light shines up through the design, clearly revealing all of your individual cuts. Works fabulously.
 Magnification. This is so helpful for intricate details. There are some awesome desk lamps that have a magnifying glass with a surrounding ring of light that are just perfect for getting up close and finding all the pieces while leaving your hands free. But just a handheld magnifying glass is super helpful, especially if you get one that has a light as well.
- Have a printout of your design handy. (This could also be an image on your phone or laptop.) It’s easier to tell what is part of the design and what needs to be removed when you can quickly glance at what the finished product should look like.
- Waste management. You can reuse a scrap piece of adhesive vinyl to collect all the bits of vinyl you remove. You can leave it sticky side up, but roll the edges under to stick it to your desk and hold it in place. (Double-sided tape works well, too!) This will keep your workspace clear, and prevent pieces from re-sticking to your project.
- Check your blade for sharpness and settings. Make sure you are cutting at the right depth for your material. If you find that cuts aren’t cutting all the way through the vinyl, make sure there aren’t any little pieces of vinyl stuck to your blade. If you suspect your blade is actually dull, you should replace it!
- A lot of people prefer to weed adhesive vinyl directly from their cutting mat. Using this technique you won’t be able to use a light pad but instead you’ll keep the adhesive vinyl on the same mat you pass through your cutting machine.
- Hot ironing board for heat transfer vinyl. For heat transfer vinyl, heat loosens the backing making the vinyl pieces so much easier to remove. You can use an iron to heat up your ironing board or a towel, and weed right on the area that’s heated. Of course, if you have a heat press, that will work as well. Watch the heat press trick in action here.
- Make your design bigger. If you’re having trouble weeding a particular design, try scaling the entire piece up in size. Bigger things are easier to weed.
- Start with the hardest part first. If you’re having trouble weeding one particular part of your project, do that part first! Once you are successful, you can finish weeding the rest, and you won’t have wasted as much time re-weeding the easy parts over and over.
- Freezing vinyl. Okay, I haven’t tried this one, but I stumbled across this recommendation: Put your vinyl in the freezer for an hour until it shrinks, to make weeding small letters easier. If anyone attempts this, please let me know how it goes!
- Use the correct cutting machine. If you have an older machine or haven’t replaced the blade in some time, weeding vinyl can be a nightmare. So if that Cricut Explore is just getting dusted off along with the weeding hooks, maybe take a look at the blades and make sure they’re still looking sharp-ish.
- To weed adhesive vinyl, you can weed directly on the transfer tape. Some people remove the outer excess vinyl, then transfer the design, and weed all the details on top of the sticky transfer tape.
- When using removable adhesive vinyl, you can save the small details for after you have completely transferred your piece. (Not for heat transfer or permanent vinyl!) If it seems like removing some pieces of vinyl might make everything fall apart, it’s actually best to wait until after you have transferred the vinyl to it’s final location. After you have stuck your vinyl in place, you can go through and remove those last tricky bits of excess vinyl.
 Magnification. This is so helpful for intricate details. There are some awesome desk lamps that have a magnifying glass with a surrounding ring of light that are just perfect for getting up close and finding all the pieces while leaving your hands free. But just a handheld magnifying glass is super helpful, especially if you get one that has a light as well.
Got any more tips? Let me know and I’d love to add them to my list!
Thanks for reading, and hope you’re out there weeding vinyl and hopefully finding some cute crafts for all that excess vinyl you’re generating!


I was actually looking other stuff when I found this article. I have a one very good tip for weeding which I founded accidentally.
Most of my cuts are large white window decals to building sites and everyone knows how painful it might be to find those smaller things from 2+ meter white sheets. Couple of years ago, a small amount of soot from fireplace blew on my cutting board when I was cleaning the chimney and eventually it transfered to my next work and when I was dusting it off I noticed that it actually bought all the cuttings very visible.
I dusted the the whole unweeded vinyl with chimney black using old and dry tshirt and I saw every line of cutting right away.
Since then, I have been using soot every time. It makes weeding much faster and error free. Obviously it didn’t worked on dark materials, but thats why I bought white chalk 😀
I suffer so much stress when removing the “negative” parts of vinyl when I am using it as a stencil. The centers of vowels and other letters must remain to make the sign readable. How is that done simply? There’s got to be a trick I’m missing.