If you’re wondering how to export a Silhouette file into a PDF, PNG, or JPEG, you’ve come to the right place!
The free version of Silhouette Studio lets you save your designs as formats that can only be used with Silhouette Studio (.studio, .studio3, .gsp). I know, it’s totally a pain.
But don’t worry, I have an easy way to save your design in any file format and I’ll show you exactly how to do that on a Mac or in Windows.
(This article is up-to-date with the most recent version of Silhouette Studio, as of November 2020.)

Table of Contents
Why would you need to save to a PDF?
There are plenty of reasons why you might need to save your design as a PDF:
- You want to take your design to be printed with a high-quality printer at a copy and print shop (like Staples or Office Depot).
- You’re designing something for a client, so they need to see your design to give it a green light before you cut it out.
- You need images to display in your online shop.
- You simply want to share your design with other people who might not use Silhouette Studio.
- You want to edit your design in Sure Cuts a Lot, Illustrator, or some other design program.
So if you want anyone to see or use your design without Silhouette Studio, you need to be able to save (or export) your design as a more common file type, like a PDF, JPG, or PNG.
Saving from Silhouette as a PDF, JPG, or PNG
Alright, so how do you actually get your Silhouette files into a usable format?
This method was tested with the Silhouette Cameo 4 and the Portrait 2 (review) (update: and also the Silhouette Curio here).
With Business Edition
If you have Silhouette Studio Business Edition, it’s easy to save your design as a PDF, JPEG, or SVG. When you are saving your file, simply click the drop-down menu for “Save as type” (on Windows) or “Format” (on Mac) and select the file type you want.
With the free version
The free version of Silhouette Studio doesn’t let you save as a PDF, but you can print your design as a PDF.
The process is a little different for Mac and PC. I’ll go through how to do this on a Mac first, and then explain how it works in Windows.
Exporting from a Mac

On a Mac, it’s pretty easy to print to PDF because this functionality is built into the operating system.
- Open up the print dialog by clicking the printer icon in the top left (or hit File > Print, or Command-P, you know the drill).
- In the bottom left corner, click the drop-down menu that says “PDF.”
- If you want to save as a PDF, select “Save as PDF.”
- If you want to save as a JPG or PNG, it takes just a couple more steps:
First, from the PDF drop-down menu, select “Open PDF in Preview.”
Then, in Preview, go to File > Export… which will open up a dialog window to save your file.
Finally, from the “Format” drop-down menu near the bottom, you can select JPEG, PDF, or PNG. Make sure to keep the resolution high, at 300 pixels/inch.
If you want to see how it’s done, check out this awesome video from CleverSomeday. The video includes tips on how to change the page size, and get rid of those pesky grid lines that won’t disappear:
That’s it!
Now how about for Windows?
Exporting from a PC

In Windows, you need another app or program that can print to PDF. These programs work as a “virtual printer,” so when you go to print your design, you select the program as your “printer” and it actually just saves it as a PDF. (A little sneaky, heh!)
There’s a good chance you already have a virtual printer installed! “Microsoft Print to PDF” is a virtual printer that comes pre-installed on Windows 10. Or if you have Adobe Acrobat, you’ll see Adobe PDF as one of your printer options.
But if you want greater functionality, or don’t already have a PDF printer installed, I recommend installing the free program PDFCreator. PDFCreator will let you save in multiple formats (like JPG and PNG), print to custom page sizes like 11×14, and save your designs as high-quality images.
To print to PDF on Windows:
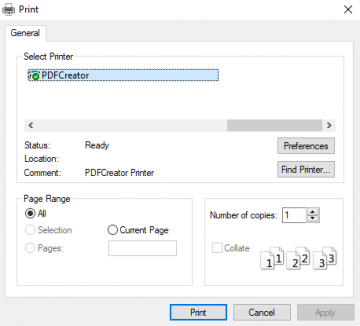
- Open up the print dialog by clicking the printer icon in the top left (or select File > Print, or hit Ctrl-P).
- Select your “virtual printer” as your printer. This will be called “Microsoft Print to PDF” or “Adobe PDF” or “PDFCreator.”

- With Microsoft Print to PDF and Adobe PDF: Hit “Print.” Select a folder location, and save your file. Voila! PDF!
- With PDFCreator, click on “Preferences” and then click “Advanced” to change the paper size or print quality (dpi) before you select “Print.”
Check out this video to see how it’s done:
Just take a screenshot
If you quickly need an image of your design, and don’t care about the quality, you can just take a screenshot! This will work on any Studio version, on any operating system.
On a Mac:
- Press Shift-Command-4. Your cursor will change to crosshairs.
- Click and drag a rectangle across your design.
- It will be saved as a PNG on your desktop!
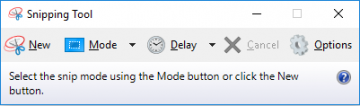
In Windows, you’ll want to use the Snipping Tool. The easiest way to do this is to:
- Click the Windows icon or start button, and navigate to the Windows search box.
- Type “snip” or “snipping tool,” and select the Snipping Tool from the search results.

- Make sure the “Mode” is set to “Rectangular Snip”. Select “New,” and use the crosshairs to click and drag a rectangle around your design.
- The Snipping Tool will show you a preview of your screenshot. From there, you can save it as a PNG or JPG.
Tips
- If you need to convert your PDF to another file format, you can use zamzar.com to convert it to any format you’d like (including JPG, PNG, SVG).
- Make sure to remove your cut lines if you don’t want to see them in your PDF or JPG.
FAQ
What is a GSP file?
A GSP file is like the .STUDIO file you usually use in Silhouette Studio, but it’s meant to be saved to an SD card and read directly by your Silhouette. Only use the .gsp extension if you are saving to an SD card to insert directly into your Silhouette’s SD card slot.
Do you need to have the Designer’s Edition?
Nope, the Designer’s Edition won’t help you here. If you buy the Business Edition (more expensive than the Designer’s Edition) you can save your designs as a PNG, SVG, PDF or JPG. But you can follow the tutorial above with the free version of Silhouette Studio.
When I save/print as a PDF and then open, I only have blank pages or certain parts are missing. What am I doing wrong?
Text and shapes are often created with no fill, and with a border of thickness “0”. If you have these sorts of cut lines in your project, they won’t show up when it’s printed or saved as a PDF!
Open the “Line Style” panel to increase the thickness of your lines so they are visible! I think 1pt lines look good. You can also fill your text or shapes with a color to be visible when printing.
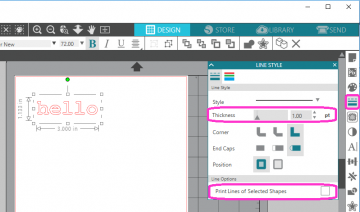
You can also select “Print Lines of Selected Shapes” down at the bottom, but this will give you only very faint lines.
When I save as PDF, the image is no longer centered on the page as it was in Silhouette Studio. How can I fix this?
Make sure your page size is set to Letter (8.5×11). If your page size is too wide, Silhouette will sometimes rotate the page and so parts of your design will no longer look centered.
If you need a larger page size, you should use PDFCreator instead of Microsoft Print to PDF.
If that doesn’t work, you can always move your design around on the page until it looks centered with you save it as a PDF. Not the best solution, but if it works, it works.
My file is bigger than the standard letter size (8.5×11). How can I save a bigger page as a PDF without it getting cut off?
If you use PDFCreator you can change the paper size from the print dialog by selecting “Preferences” then clicking “Advanced Settings”. See the video above to watch how it’s done.
How do I get rid of the grid lines from Silhouette Studio?
On the top menu bar, select “View” and uncheck “Show Grid.”
If this doesn’t work, you’re probably on a Mac trying to save a PDF. (It’s a known bug.) In Preview, you can export as a PNG to get rid of the grid lines. Then you can export that PNG to a PDF, and you’ll have it without the grid lines.
What’s the difference between JPEG and JPG?
Nothing! JPEG and JPG mean exactly the same thing. You can save your files as either .jpg, .jpeg, .JPG, or .JPEG and they all will be the exact same file. Personally, I prefer to use .jpg.
How do you save it as a PNG with transparent background?
Use the free webtool LunaPic to make a PNG with a transparent background.
- Go to lunapic.com and click on “Browse” to navigate to your folder and upload your file for editing.
- Select Edit > Transparent Background. And then click the color(s) you want to make transparent.


Hi Ali,
Thanks for dropping by my blog the other day. I wish I had a post like this when I began using my Silhouette. I will definitely pin it to my Silhouette Tips Pinterest Board.
Bonnie
Thank you so much for your tutorial. I liked that it was a step by step. Sometimes tutorials just assume we know some of the steps. However there was one thing. As I followed along my steps looked somewhat different and the pop-ups didn’t look the same but I used the “ol nogging” that God gave me and figured it out, trusting that it would eventually work out and it did. Thanks again Ali for your time.
Thanks! Been a problem for me sending a sihouette file to my sticker printer.. Mhuah mhuah. Lab u!
hello, I have the studio designer edition and I can’t save it as jpeg or png, is there any other way? Thank you!
Hello, I just bought Business Edition and there isn’t an option to save as Png. Only Jpg and PDF (and a few others of course) Am I missing something?
OMG! thank you so much.
I read 4 lines and saved myself hours of searching on how to do this.
Thank you for this! You saved me HOURS of work!
hi
thanks for this info. i would like to install pdf creator. when i search pdf creator there are lots of links coming up. do u have any particular one which will keep the dpi as it is in the silhouette file please. i am trying to make a wedding invite and i want to send them to the printers. its a floral design and each flowers i used are 300 dpi. so what is the best way to do it please.
thanks
D
I did these steps on my own and my PDF is all white… found your site and did them again thinking maybe I missed something and this happened again. Any idea why? Thanks!
Thank you sooo much!! I have read a hundred misleading articles before i found this THANK YOU THANK YOU THANK YOU!!!
I just wanted to say that I LOVE YOU
If this works to make higher quality stickers I will always be greatful
I’ve used this technique many times! If you have any issues, let me know!
Hi, I have mac with the most recent version- however now when I try to PDF from print, it goes to a silhouette print version that I have not seen before. Nothing I try goes to the Mac dialog box– any suggestions?
I have always used the save as pdf in iHeartRadio print dropdown… but now it’s gone 😫
Is there a new way?
Thank you for the great tutorial on getting rid of those annoying lines when trying to export a design to pdf. I am running 4.4 now, on a Mac, and the new way the print box works does not let me choose from the drop down FILE tab to choose the PDF PREVIEW and then export to png. Ugh!
I cannot figure out how to get rid of those lines, and they’re distorting the design even where they don’t show up. I need to send my design for print and I’m at a loss how to get around it!
Can you think of any solutions?
Thank you!!
Laurie