Everyone struggles with weeding vinyl. (Trust me, everyone does.)
That’s why Cricut developed the BrightPad, one of the only light pads actually designed for crafting.
The Cricut BrightPad was all the rage when it first came out, back in 2017, immediately selling out for Christmas! But does it still live up to that hype?
I’ll explain exactly what the BrightPad is, what it’s used for, and take you through all the good (and bad) features. I made a neat table comparing it to some other lightboxes and found you the best deal on where to buy it. I’ll also explain exactly how to weed vinyl with a light box, + a bunch of tips & tricks to help you when you’re having trouble.
Now, on to my review of the Cricut BrightPad, starting with a quick comparison.
(feel free to skip ahead if you just want the best deal)
Table of Contents
How does it compare to other light pads?
There are actually quite a few different light pads you can find because so many crafts and drawings are much easier when backlit. I analyzed the best-selling light pads to give you all a quick comparison of the most popular options:


As you can see, the Cricut BrightPad (best deal here) does cost more than some comparably-sized lightboxes. But it has a more scratch-resistant surface and brighter output, which makes it a better choice for weeding vinyl.
If you are looking for a light box just for tracing or more delicate crafts, one of these other lights pads would be a better choice, but I would keep that X-Acto knife away from the surface!
2023 Review of Cricut BrightPad
What is the Cricut BrightPad?
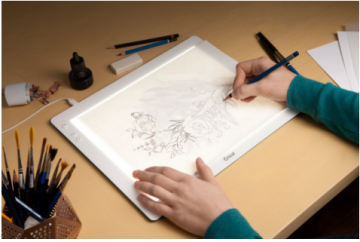
The BrightPad is a light box that you can use as a backlight for a number of crafts, like weeding vinyl. It looks like a tablet and provides a bright, even light to illuminate your workspace. Having a good source of light not only lets you see all the details of your crafts but also prevents eyestrain as you work on your projects.
What is it used for?
- weeding vinyl and iron-on
- tracing lettering, drawings, pictures, & more
- paper piecing quilt blocks
- making jewelry
- model building
Pros and Cons
| PROS | CONS |
|---|---|
|
|
Key Features
Okay, let me break down these features in more detail.
Design: simple, lightweight and beautiful
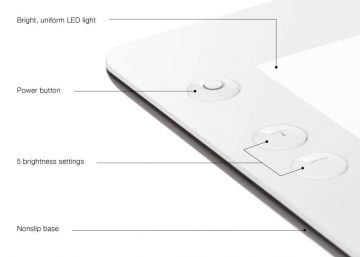
The Cricut Brightpad is a sleek machine that is easy to use, right out of the box. There is no setup required, you just plug it in and hit the power button to turn it on. There are just two more buttons that control the brightness: + and -. You’ll probably forget to even look at the instruction manual.
It has an attractive, sleek design with white borders and rounded corners. It’s super slim, at 0.35 inches thick, meaning it can easily fit into carrying cases you might use for a laptop or vinyl cutter. And it’s sturdy enough that you can do so safely.
It now comes in blue, mint, and rose, so you can get it to match your Cricut Maker or Explore Air 2!
It has a non-slip base so you can lay it securely flat on your desk while working with sharp knives or important birthday presents. Since it weighs 1.75 pounds, you can instead hold it comfortably in your lap as well.
Surface: wide and scratch-resistant
Okay, I admit that it can be a little nerve-wracking taking an X-Acto knife to the surface of your brand-new device, that looks suspiciously like a fancy a tablet. But this thing is 100% designed to withstand sharp tools!
The light-up polycarbonate area of the BrightPad boasts a 6H rating on the Mohs hardness scale. What does that mean? It’s as hard as titanium. (Cricut notes that most other lightboxes only rate up to 3.5H.) It’s designed to hold up to the usage of craft knives, weeding tools, pins, tweezers, or any other craft tools you might want to use its light for. It might still get some surface scratches with heavy usage, but that doesn’t diminish the light or utility of the lightbox.
The working area of the BrightPad measures 11.5″ wide by 9″ tall, which provides ample workspace for standard letter-sized projects.
Light: adjustable LED
How good is the light? This is probably the most important quality to examine when you are looking at buying a device whose sole purpose is to, well, provide good light.
I found the LED backlight to provide a steady, uniform light across the entire light-up area. If you’ve ever used an old-fashioned lightbox with fluorescent bulbs, you’ll definitely appreciate that this one doesn’t get hot, and provides even light all the way to the edges. It’s actually brighter than most of the other affordable light pads designed just for tracing, which you definitely need for trying to weed heat transfer vinyl.
And the best part?
The light is adjustable. There are five different levels of light so you can find the brightness that works for your project. At the brightest setting, you can even see through watercolor paper. And sometimes, like in a dark room or when you are weeding white adhesive vinyl, the most comfortable level is actually one of the lower settings.
Here are the hard numbers, if you want to compare it to some other light pads:
| Level | Lumens |
|---|---|
| 1 | 400 |
| 2 | 1300 |
| 3 | 2200 |
| 4 | 3100 |
| 5 | 4000 |
Power: USB powered
The Brightpad comes with a 6-foot USB cable that conveniently plugs into the back of the light box, so it doesn’t get in the way while you’re working. It doesn’t come with any sort of rechargeable battery, so you are tethered six feet away from the nearest power source.
But since it’s USB-powered, you can always plug it into your laptop or a portable battery, if the power cord doesn’t quite reach your workspace.
Warranty
Like other Cricut machines, it comes with a 1-year limited manufacturer’s warranty.
Conclusion
Overall, this is a great little light box that is incredibly useful for any number of crafts. Seriously, it’s hard to go back to using mundane overhead light for weeding or other projects that require fine details. (Or what I used to do, which was angle a lamp right across my desk to try to reveal my cut lines.)
The design looks and feels good, and it has a wide working surface that provides bright, uniform light. The surface is durable enough to be used with various weeding tools. This light box is slim and lightweight, so it’s pretty portable. But if you’re looking for a wireless light box with a rechargeable battery, you’ll have to look elsewhere (and go up in price).
The biggest drawback when the BrightPad first came out was probably the price, but it’s gotten much cheaper since then, I think it’s actually a great deal right now.
Best place to buy the Cricut BrightPad
After checking all the retailers I could think of, I’ve confirmed that this is the best deal for the BrightPad right now:
- Lightweight, attractive, well-made light box designed for weeding vinyl
- Adjustable LED light goes up to 4000 lumens
- Nonslip base and durable polycarbonate surface
- 9in by 11.5in lit area
How to use a light pad for weeding vinyl
Okay, if you’ve done any vinyl crafts you’ll know by now that one of the hardest and most time-consuming parts is the weeding. As your aspirations soar, so does the difficulty of weeding those intricate, complex designs.
Weeding vinyl is simply removing the unwanted portions of vinyl, or negative space, to reveal your design. It’s just like weeding a garden to show off your flowers! (It took me an embarrassingly long time to realize that it was actually the same meaning.)
I’ll give a quick step-by-step on how to weed with the light box, followed by a bunch of tips and tricks to help you out.
Step-by-step guide
To use the BrightPad (or any other light pad) to weed vinyl:
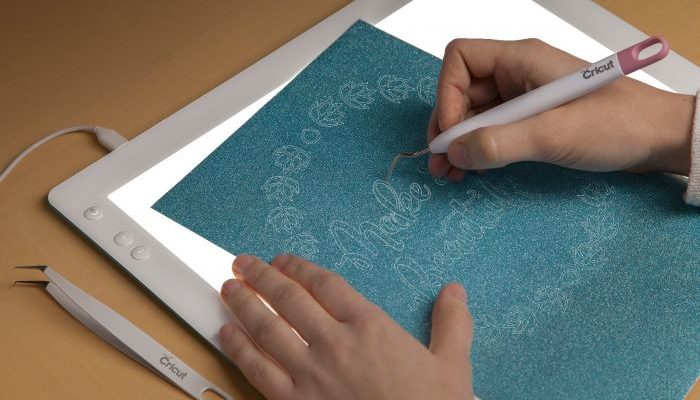
- First, simply place your cut design on the pad, carrier-side down so the cuts are on top.
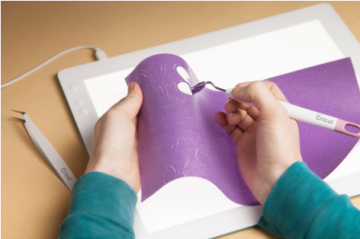
- The light will show through the cuts, so you can see which parts to remove.
- Take a weeding tool (my favorite is the standard pick tool that comes with any weeding toolset) and dig into an unwanted section, then pull up and remove.
- Continue to remove all the negative space, until you are left with only your design.
- Remember to remove the big piece surrounding your design as well!
- Then just use transfer tape (for adhesive vinyl) or an iron or heat-press (for iron-on) to transfer the vinyl design onto its final home.
Tips & Tricks
- You can tape down the edges of your project to make it more secure to work on.
- A straight pin or tweezers work well to dig and pull out tiny pieces from your design.
- Looking from an angle still helps see the cuts, even when they’re backlit.
- Glitter HTV is surprisingly porous, meaning the light shows through the entire sheet (not just where the cuts are). Try using a lower setting on the BrightPad, as well as turning down any overhead lights.
- Any sort of reflective, holographic, and metallic vinyl is going to have a ton of glare from ambient lights, making it hard to differentiate your cuts. Work in a dim room to make it easier to see.
- Light-colored materials will be easier to see on low light settings in a dim room.
- Dark-colored materials will need brighter settings to see the cut paths.
- Bending your sheet of vinyl will open up the cuts, making them much easier to spot. (This is especially useful for HTV.)
- Plug it into your laptop or an external USB battery if the power cable isn’t long enough.
- If you’re getting a headache or eyestrain, turn down the brightness! Staring at a bright light in a dark room isn’t great for your eyes. You only need the brightest when you’re in a bright room.
Thanks for reading! Again, if you have any other tips, or especially any questions about the BrightPad, please leave them below.
Happy weeding!


I have misplaced my power USB cable for my Brightpad. I have looked online and haven’t been able to find one. Any suggestions?