Most of my crafting I do as a hobby, but recently I’ve started making decals for cars as a side business.
You don’t necessarily get a lot of repeat customers, but the word of mouth spreads and before you know it you’re making decals for a whole fleet!
(Either way, it’s super fun.)
If you have a Cricut (or any cutting machine), I’ll show you how to make car decals using it at home.
If you don’t, I also have a method for how to make decals for your car by hand.
Table of Contents
What is a car decal?
Car decals are made from adhesive vinyl, designed to last outdoors and work with any smooth, flat surface. You can use them on your car but they also work great for laptops, storage containers, or home windows.
A car decal, once it’s ready to apply, will have three parts:
- The backing paper, usually an opaque white or blue
- The vinyl decal itself
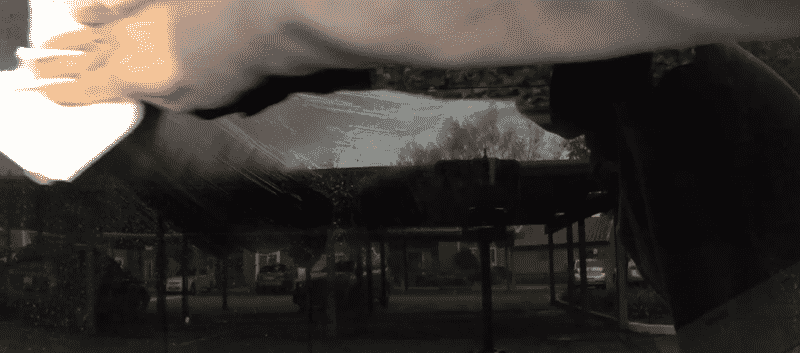
- The transfer paper (what the finger is pointing at in the picture below)
![]()
I know there are some people out there who feel like having a decal on your car is a bit tacky, but hopefully that’s not you because you’re reading my tutorial!
Even if you do feel that way, there’s a lot more to them than just window stickers. You can customize your entire vehicle in a way that looks better than paint, is more durable, and can be easily changed out in the future.
Some other benefits:
- You can share your interests with the world.
- You can make pretty good money selling your own.
- Instead of buying something pre-made, you can make exactly the vinyl car decal you want.
- They make really great gifts, even for people without cars!
- If you have trouble finding your car in the parking lot, they might save you some time? (This one might be a bit of a stretch.)
Are you convinced yet?
Well, if not, maybe you’ll have fun learning about how to make your own car decals at home anyway!
How to make car decals: a DIY tutorial!
Like I mentioned in the introduction, there are two ways to make your own vinyl decals for a car. You can either use a cutting machine (like a Cricut Explore Air 2, Maker, or Silhouette Cameo 4) or you can DIY by hand.
I’ll explain both ways.
Let’s first gather up all of the supplies you need:
- Cutting machine (optional)
- Masking tape
- Scraper/squeegee
- Transfer paper
- Tweezers
- X-Acto Knife
- Tape
- Scissors
- Adhesive vinyl (I recommend Oracal 651)
- A design!
If you don’t have a design, I have a pretty great collection of free SVG sites that you can check out. SVG files are really easy to work with and you can scale them to whatever size you need.
The techniques of applying decals to a car window are pretty similar, so I’ll take you through how to do it with a cutting machine first and then by hand after.
The real difference is in how you make the window decal, not how you’ll apply it.
On to the instructions and tutorial!
Step 1 – Prepare your design
If you’re working with Cricut machines (like the Cricut Explore Air 2 or the Cricut Maker), Design Space makes it really easy to get started on this project.
Unlike working by hand, you can easily re-size and perfect your design before it touches any materials. In my experience, this makes projects a lot easier to start because you aren’t worried about messing up.
Since we’re making a vinyl car decal, you want to make sure the design you’re picking out is easy to weed.
I’d avoid really complicated or distressed fonts for your first project.
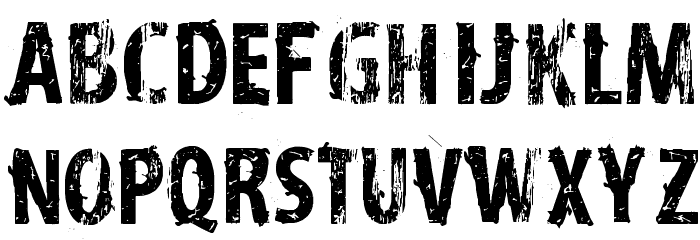
(See above font for what I’d definitely avoid!)
Step 2 – Cut the design
Pretty straight forward! Cutting a design for a vehicle window is no different than any other vinyl project. The only thing that sometimes trips people up here is whether or not to mirror the design.
Only mirror your design if you’re placing it on the inside of your car window. Anything going on the outside doesn’t need any modification at all.
(If you are mirroring it, make sure to choose “horizontal” for the flip!)
For vinyl car decals you can use your Cricut Standard cutting mat. You’ll place the vinyl on your mat shiny-side up (or colorful side up).
Step 3 – Weed your vinyl
Nothing unusual here. You’re going to remove the pieces of vinyl that aren’t part of your design. I usually start with the inside pieces and work my way out, but either way works fine.
If you need a hand, check out my guide on weeding vinyl.
Step 4 – Apply the transfer tape
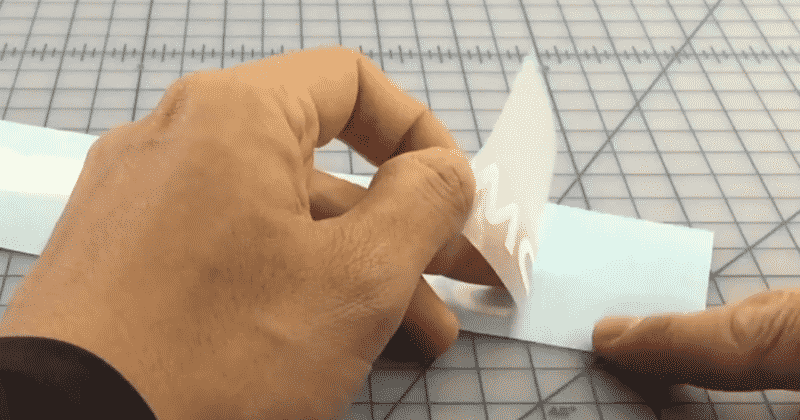
You’ll take your transfer tape and apply it over the design. Use your scraper to make sure it’s stuck really well. You’ll want to do a quick test on both sides of the decal to make sure it’s firmly on the transfer tape.
Partially peel one side halfway to make sure it’s stuck well, then apply it to the backing again. Repeat with the other side as you can see above.
If some of your vinyl is sticking to its backing instead of your transfer tape when you test it, just cover it back up and burnish for another few seconds and it should release.
Step 5 – Clean the car window
Before you get too excited, if your car looks anything like mine it might really enjoy getting a bit of a scrub, at least where you’re thinking of applying the vinyl to the window.
I don’t get too fancy here, I use soapy water and clean the surface where I want to apply the vinyl.
If you mirrored your design earlier and are applying it to an inside window, you’ll do the same thing. I’d avoid Windex or glass cleaner, but rubbing alcohol is just fine.
Use a microfiber cloth to dry it off, and you’re ready to apply.
Step 6 – Apply the vinyl to your car window
Pretty much the same process as above where you applied the vinyl to the transfer paper, now you’ll place that same paper where you want your design to be.
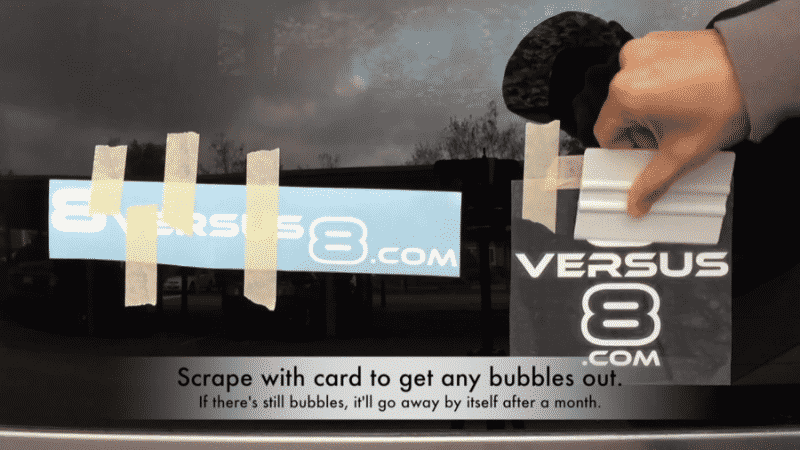
You’ll use your masking tape to hold the decal in position.
If it’s a square or smaller decal, you’ll lift the decal vertically, remove the backing paper, and then slowly press down from the top

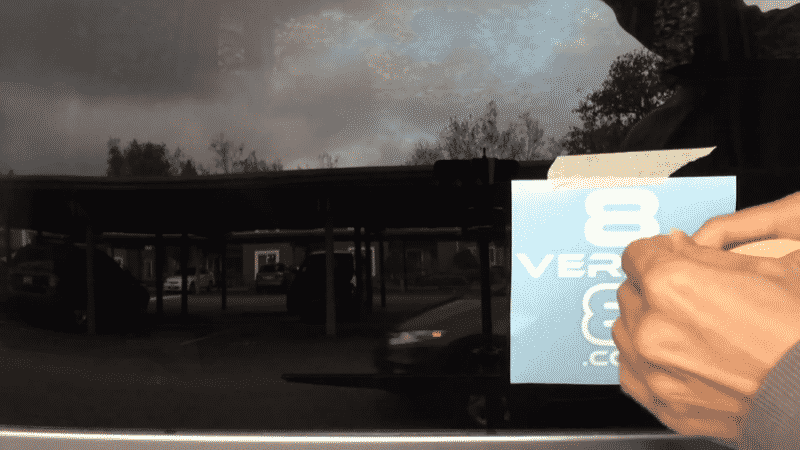
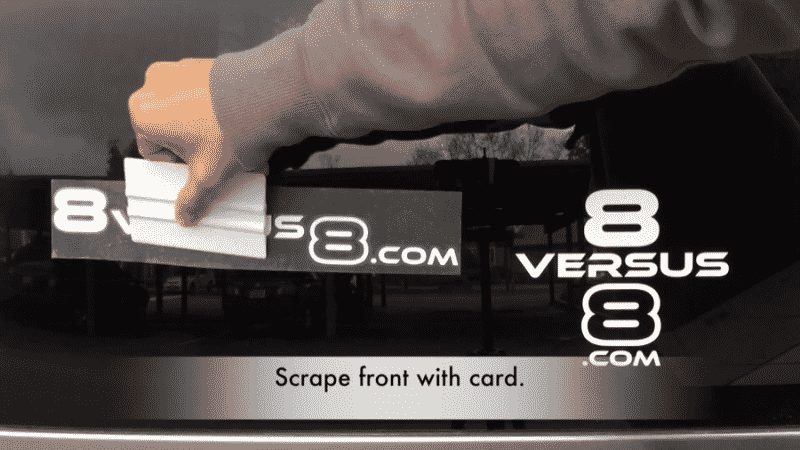
Now that the decal and transfer tape are on the window, you’ll use your scraper to evenly apply the vinyl to the glass.
When you’re peeling the transfer tape make sure to keep a steep angle and do it slowly. Just take a look at the picture for an example.
![]()
![]()
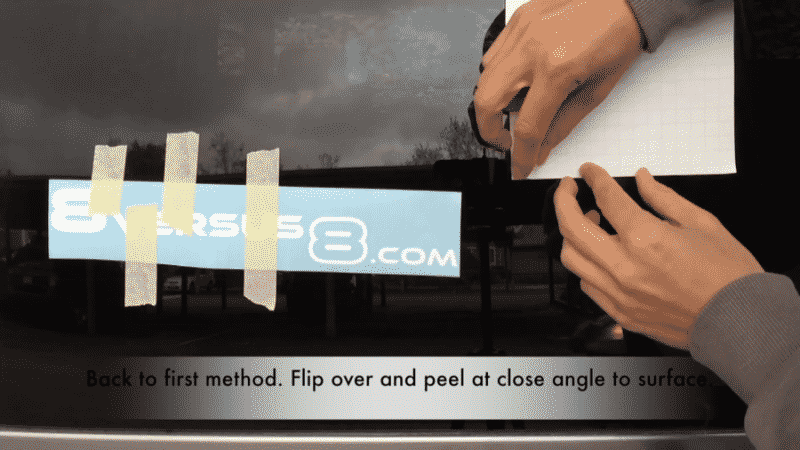
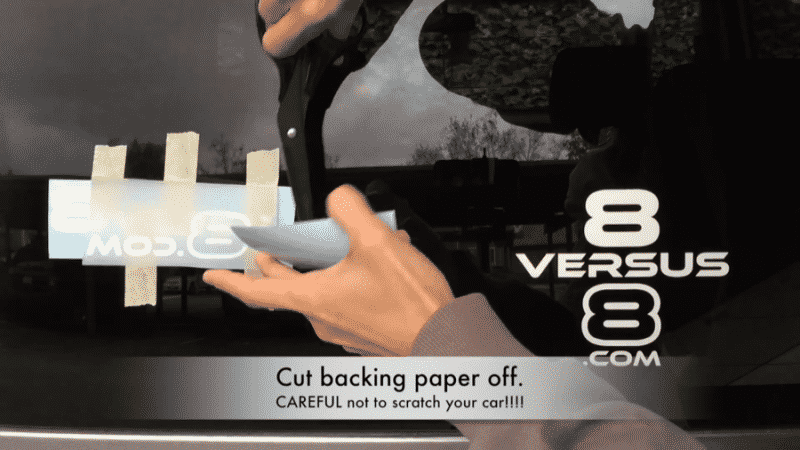
If it’s a larger, long decal, you’ll want to start by putting a piece of masking tape down the center, then tape down just one side so you can apply the other.
![]()
You’ll lift one side of the backing and then cut it off.
Slowly roll the decal back on.
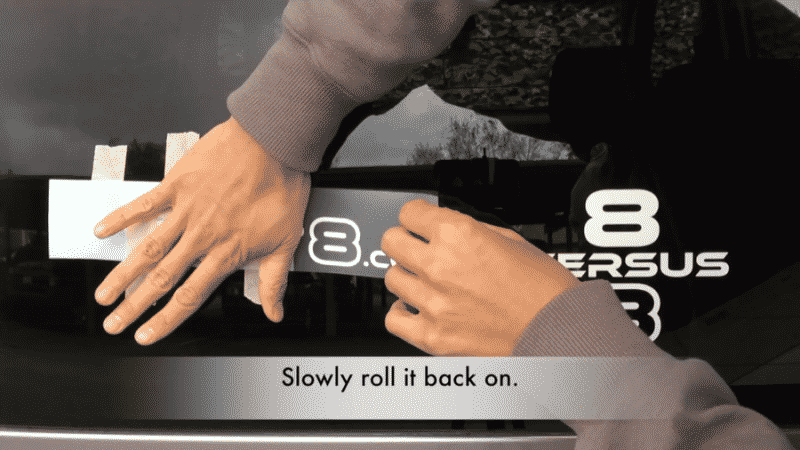
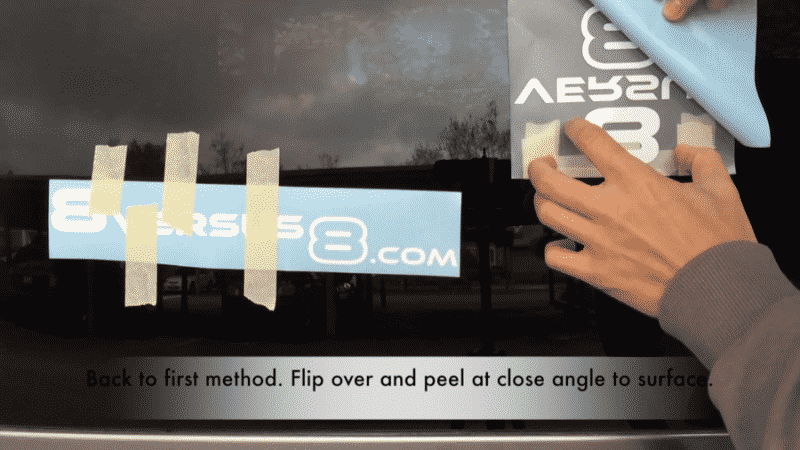
Burnish that side down, remove the masking tape from the other side, then peel the backing and repeat the burnishing.
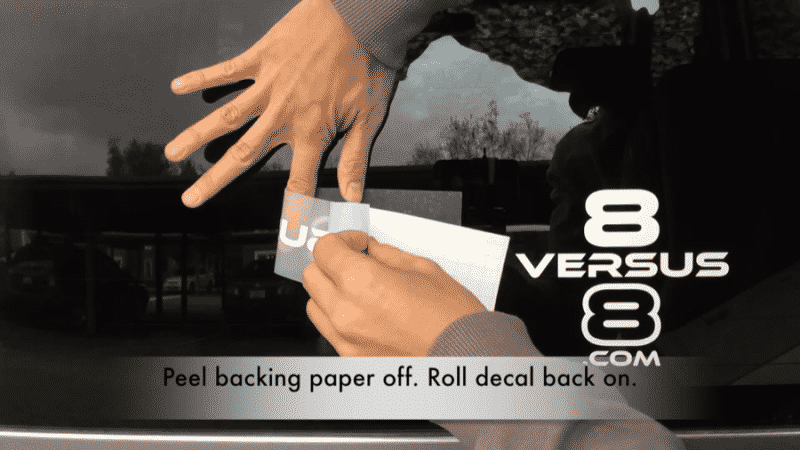

You’ll use a finger and roll the decal onto the window.
If the decal doesn’t stick, just press the tape back down for a moment, rub it with a finger or fingernail, and then pull again.
![]()
Press all corners of the vinyl down with your finger.
You’re done!
If there are any bubbles, you have a few options.
- You can use a small pin and pop them
- You can usually just wait a few weeks and they’ll disappear on their own. <– This is my method of choice.
- You can use a heat gun or hairdryer to get them out
If you don’t have a cutting machine, let’s cover a quick technique for making a vinyl decal by hand.
Making a vinyl car window decal by hand
You have a few options here, the easiest if you don’t have a cutting machine is to buy letters or vinyl decals and combine them into a new design. You can find these pretty easily on Amazon, just pick out a font you like along with a design and you can follow the above guide to apply them cleanly.
If you want to make custom vinyl car decals that you can do at home, you can print out a design and basically trace over it.
- Find the design you want and print it out on regular printer paper
- Grab a piece of adhesive vinyl, and tape it to a cutting mat. It should be slightly larger than the design.
- Take your design and tape that on top of the vinyl to the same mat.
- Taking your X-Acto Knife, cut through the outer paper, tracing the outside of the design
- After cutting the outside of your design, now cut any interior designs out.
- Remove the excess vinyl that you just cut with your weeding tool. If you don’t have one, you can use tweezers or the tip of the X-Acto Knife you used to cut. You can also remove the tape from the vinyl design at this point.
- Take a piece of transfer tape and burnish over it to adhere the vinyl to it.
- Following the above guide, making sure your windows are cleaned and dry, apply your decal to your car window.
You’re all set!
I’ll now go through what to avoid and all of the questions I hear the most, like how to weatherproof your decal sticker, what kind of outdoor vinyl to use, and whether it’s better to apply your decals to the inside window or outside.
What to avoid and tips
- If you made a mistake and are looking to remove the decal (or you just get tired of looking at it!) you should gently heat up the sticker and peel from one corner. If it’s on a window, you can apply small amounts of isopropyl alcohol once it starts lifting, but don’t heat up and apply the isopropyl simultaneously.
- Make sure the surface is clean before applying the vinyl. Most decals that fall off or peel are due to a rough or dirty application of the vinyl. This is true for any decals. Glass is usually a great surface for adherence, but it has to be clean.
- You don’t have to mirror the design unless you’re applying it to the inside window. If you accidentally mirrored it and are just reading this now: well, just apply it inside!
- Don’t touch the vinyl adhesive. Just like applying a sticker to a dirty surface, the adhesive will pick up the oils and skin from your hand and be a lot less effective.
- Be gentle when removing the vinyl backing. Once you have the transfer tape coming off, just remove it slowly, you’ll save time by spending a bit more right now.
- If you are applying the decals to your paint, just be careful that you don’t use too strong of an adhesive or you could see some paint coming off if you remove them. You could work with something like Oracal 631 which is a semi-permanent removable vinyl with a less strong adhesive.
Conclusion
So, a little bonus. If you’ve followed this guide on how to make your own car decal at home, you’ve actually learned how to make a second project I didn’t even mention.
Can you guess it?
Window decals for your home!
I love decorating my windows for the holidays. For a while, I used those pre-made gels that you can buy at the store (which I still love). But now I can customize those designs and make anything I want!
If you have any questions, please let me know in the comments! And share your projects!
Car decaling is super easy, and while I just covered applying them to windows in this tutorial, the same principles apply to putting them on your car bumper or any other area of your car.
Just heed the above advice about removing them later!
FAQ
How can I remove a car decal?
You can either use a less strong adhesive like Oracal 631 or gently heat it up with a hairdryer and peel from one edge. You’ll have some adhesive goo leftover, you can use Goo Gone or a similar product, just make sure it doesn’t get down into the rubber seals. You’ll also want to clean it off after so there’s no Goo Gone residue left.
How intricate can the design be?
This depends on if you’re cutting with a cutting machine and laying out your design in something like Cricut Design Space. Also, how patient you are with weeding vinyl. I’d try a simple design first and then get more adventurous later on.
Can I place a decal on my bumper or car paint?
Absolutely! The adhesive in permanent outdoor vinyl (like Oracal 651) is extremely safe to use on a car. Oracal 751 is often used for car wraps and it uses the exact same adhesive backing (it’s just a bit thinner and easier to apply to a complex surface like a car).
What should I use to clean?
I like using just plain water, but you can add a little bit of dish detergent if it’s especially dirty. To make sure it’s dry after, clean with some rubbing alcohol.
Can I put it on the inside?
Yup! You’ll have to mirror the design, but this is a great way of keeping it safe from the weather and looking great for a long time.
Will the decal survive a car wash?
Yes, it’s fine to use a car wash! I’d wait around a week or so for the adhesive to cure, but after that you’re good to go.
What about windshield wipers?
The decal will probably be fine, but you can wear away your wipers a bit faster. I usually place my designs where the wipers don’t hit them, or I use the inside window.
What kind of vinyl can I use for a decal?
I prefer Oracal 651. If you’re using a large design that wraps around the car or has to contour to its surface, you’ll want Oracal 751. I go through the differences between 651 and 751 in this article.
What about car decal vinyl?
There isn’t really a vinyl specifically made for only cars, so the above recommendations are what will work the best.
Will it interfere with heater coils?
Nope! The heater coils will keep working just fine, and they won’t damage the vinyl at all. The number one enemy of vinyl is almost always the sun and its UV light, so you can either place the decals inside because your glass will filter some of the UV, or you can place them outside and 651 is rated for a minimum of 6 years.
How do I give a car decal as a gift?
If you’re selling them or giving them to friends, I’d put them on the transfer tape and give them that way. If they don’t have a scraper to use for applying, they can just use an old credit card.
What’s the difference between a car sticker and a decal?
Basically the same thing! Stickers (like a bumper sticker) usually are printed and a variety of colors. A decal is cut usually of a single color of vinyl, although there is printable vinyl as well that you can use.


What kind of transfer tape should I use if I’m putting the decal on the car door? Is there a risk of the paint peeling off with the transfer tape? Thanks!!