Nervously staring at an unopened Silhouette box that’s been gathering dust? Still not sure how to get started?
Or… maybe you have the packing material shredded and scattered like confetti around the room as you race to get your new machine into your crafting area?
Either way this tutorial will guide you through how to use your Silhouette Cameo 3, even if you’re a complete beginner.
If you have an older model, the same basics will still apply: I’ll cover everything you need to know.
Tips, tricks, setting it up, and how to make the software easy to use.
At the end I’ll also give you a collection of free SVG files + designs to get started.
(March 2023: Updated with the latest information about the software updates to the Silhouette Design Store.)
Let’s start with the most fun part: unboxing. Are you excited? Yes!
Now let’s get you prepared.
Table of Contents
Getting started with your Silhouette Cameo 3
Unboxing
If you don’t have a Silhouette Cameo 3 yet, click here to check out my complete review.
This article will be more of a quick setup guide for those who want to get on their feet fast.
First, let’s make sure all the included items are actually included.
If any are missing you can either contact Silhouette for a replacement or return your CAMEO 3 to where you purchased it for a free exchange.
If you already have it unboxed and set up you can cut ahead to the section on using Silhouette Studio.
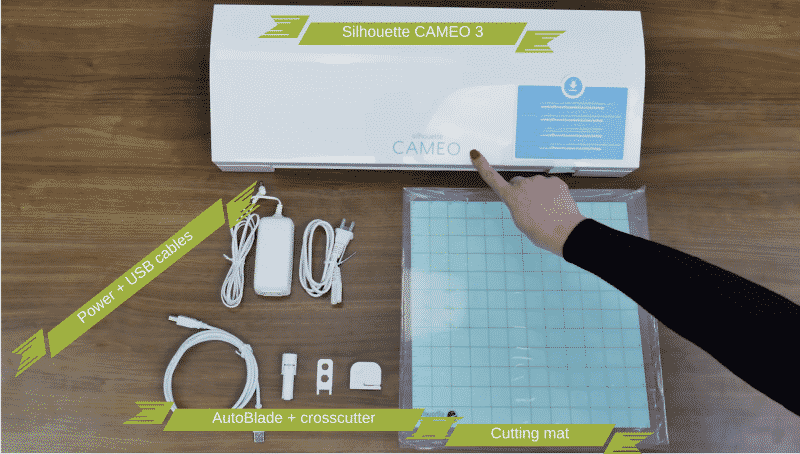
You should have:
- Your Silhouette Cameo 3 (if not, here’s the best deal as of September, 2018)
- 12-inch cutting mat. This is going to be how we load most material into our Silhouette machine. It’s adhesive on one side for holding our material securely in place.
- (1) AutoBlade. An easy-to-use accessory that automatically adjusts to the blade setting you choose in the software. You’ll typically replace this every 8 months with regular usage.
- (1) Crosscutter. Super useful for cutting rolls of vinyl.
- Power + USB cables.
After you’ve verified that you have all the included goodies go ahead and register your machine at: silhouetteamerica.com/setup. You’ll find a unique serial number on the back of the machine. After you complete the registration process you’ll also be signed up for an official Silhouette account which comes with a 30-day free trial to the Silhouette Store and a $25 credit for purchasing designs, projects, and fonts for your CAMEO 3.
Go ahead and store the packing materials back in the box. I move my machine around a lot and being able to safely transport it is what gives me that flexibility. If you need to consult the software or machine manuals, you can find them here.
Now is also a good time to check the outside of your box while you have it handy. Later on we’ll be setting up the Bluetooth so just note now whether or not it reads “Bluetooth included” or “Bluetooth compatible.”
If you haven’t already, remove the protective tape covering the lid and the blade carriers. You’ll also find foam pieces inside of the machine, you can toss these into your box.
Connecting your machine to your PC/MAC
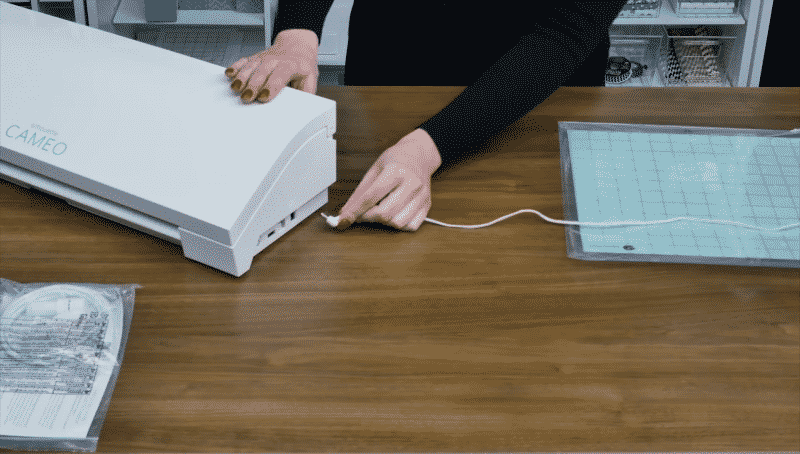
Plug the AC adapter into the right side of the Silhouette and turn it on by pressing the power button. You’ll now be met with the initial setup screen on the touchscreen which is visible on the right side. Select your language of choice. Now that you’ve turned on the machine you’re ready to install the Silhouette Studio software.
Silhouette Studio
If you aren’t sure how to use the Silhouette CAMEO 3 with Silhouette Studio, you’re in for a treat. Studio is fantastic, not only can you create your own designs or import designs from friends, but you can also purchase or freely download 100,000’s of designs either from the web or from your Silhouette Design Store account. No more relying on cartridges or manual dies! This is a game-changer if you’ve never used a machine like this before.
Download the software here and select the option for your operating system. Click through the Silhouette Studio setup and install the software, launching it after you finish.
Now that the Silhouette and its software are both installed and ready, let’s get your CAMEO 3 ready for cutting and then explain the basics of Silhouette Studio’s interface.
Using the Silhouette CAMEO 3: Your first design
You’ll start by loading the AutoBlade.
The AutoBlade is your primary cutting tool which is set automatically to the required depth for each job. All you need to do is load it once into the machine. You can follow along with this 10 second video:
- Unlock the blade carriage by pulling the lock lever out.
- Insert the AutoBlade.
- Press the blade carriage forward. Now it’ll be properly fastened while your machine is cutting.
Using Silhouette Studio
Now let’s go back to the Silhouette Studio program — if you don’t have it open do that now. You’ll see the main screen which is covered with a 12×12 cutting area, the same as the provided cutting mat.
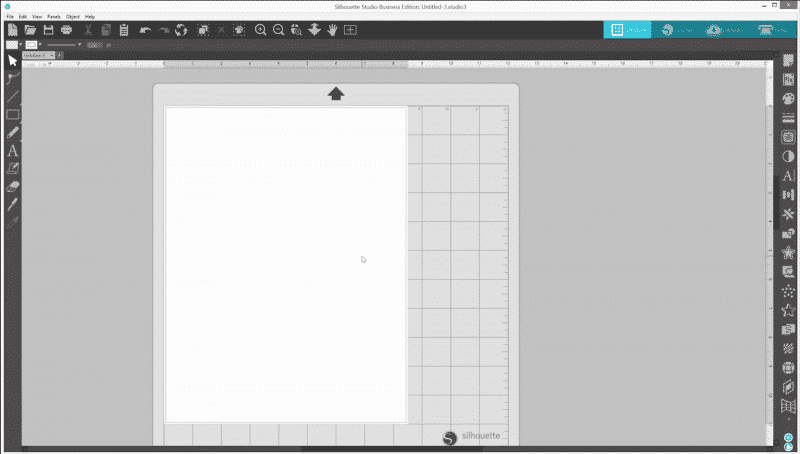
For our Silhouette CAMEO 3 tutorial let’s make something simple, like a basic cut shape.
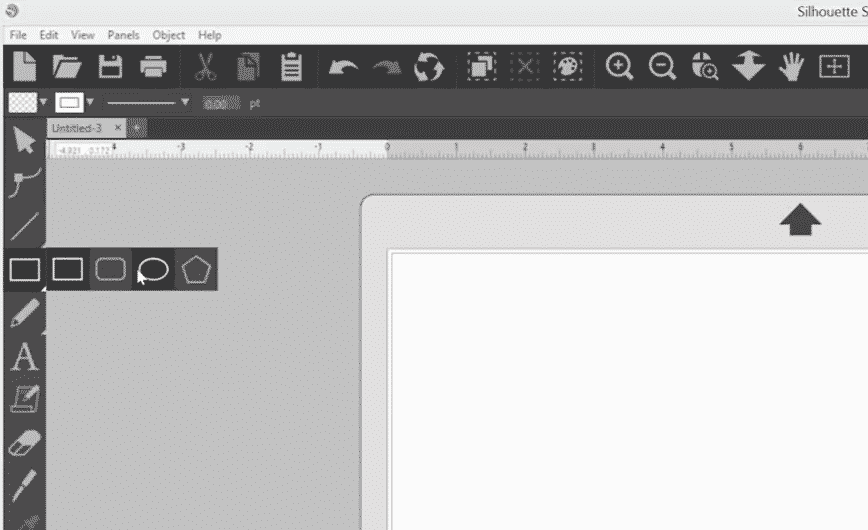
- Click on the shape tool on the left.
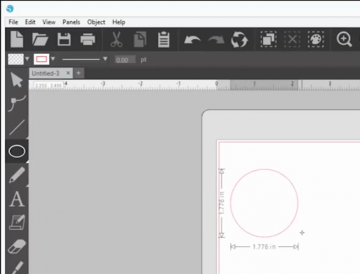
- Click and drag with your mouse in the cutting area to draw a circle. You’ll be shown exactly where on the mat your image will be cut. If you find that it’s drawing an oval instead of a circle, hold shift as you drag and it will magically become a perfect circle.
- Connect the Silhouette CAMEO 3 to your computer using its provided USB cable. If you haven’t removed the protective liner from the cutting mat, remember to do that now. Tip: this worth saving that you can protect your mat later.
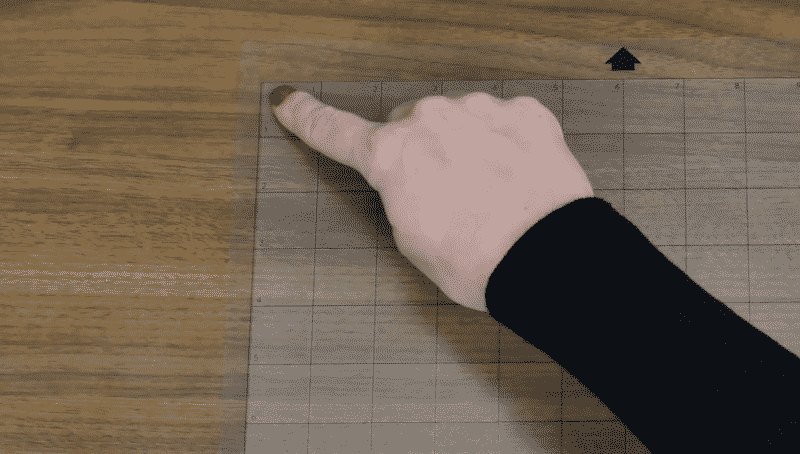
- Place your material in the top upper left corner of the mat as shown in Silhouette Studio. In this example, we’ll start with cardstock. Note: the cutting mat will be very sticky, material might stick to it at first. this is normal, it will become conditioned overtime.
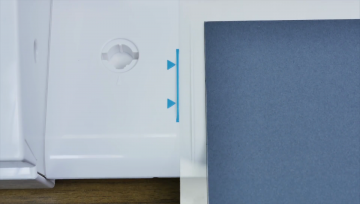
- Align the left edge of your mat with the blue guide marks on the machine. Make sure the cutting mat rests against the white rollers.
- Touch the load button on the touch screen. The cutting mat should now be loaded into your CAMEO 3.
- Now let’s return back to Silhouette Studio. Click the “send” tab on the top right of your screen and choose the appropriate material type. In this example you’ll want to select “Cardstock, Plain.” Select “Cut” as your action and “AutoBlade” as your tool. These should be the default settings but sometimes they can get accidentally changed. Now that you’ve verified everything is in order, click the blue “send” button at the bottom right to start the cut.
Your machine will automatically adjust the blade depth for the material you’ve selected. After your design is cut go ahead and tap “unload” on the touch screen to unload your mat. You can now peel off your newly cut material from the mat.
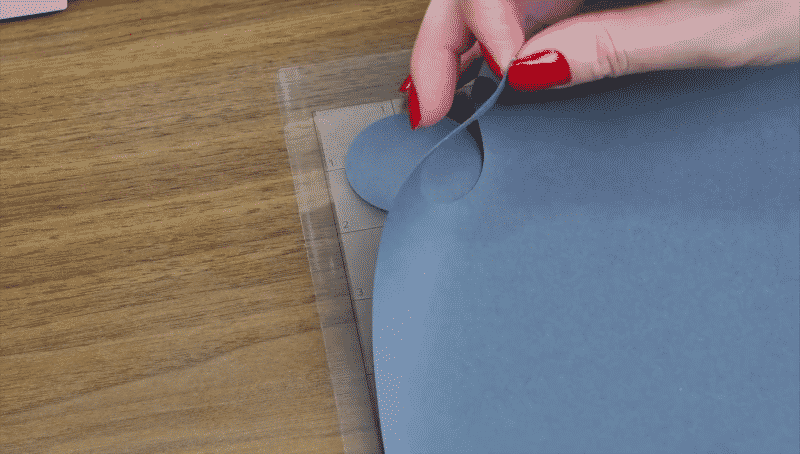
TADA! It may seem like a lot of work the first time but I promise it gets a lot easier, kind of like driving a car. Okay, driving a car is still a pain-in-the-neck for me so it’s even easier than that!
Still with me? Great!
I’ll cover taking full advantage of Silhouette Design Store in the next section and then I’ll move on to a tutorial on cutting vinyl and more advanced designs.
Silhouette Design Store
Silhouette Design Store is awesome, as I mentioned before you can view and purchase over 100,000 designs to that will automatically be linked to your cloud account. To start, your account will be loaded with 100 free shapes.
Click on your “library” tab in Silhouette Studio. Sign into your account. Your images will be automatically loaded into the library once you connect the USB cable to the Silhouette. If they don’t appear, try unplugging and reconnecting the cable.
If you didn’t register your account earlier now would be a great time to do that because you’ll get $25 to spend in the Silhouette Design Store — most designs cost $.99 so this is basically 25 free designs of your choice.
You should have an email thanking you for registering from Silhouette America with a complimentary trial code inside.
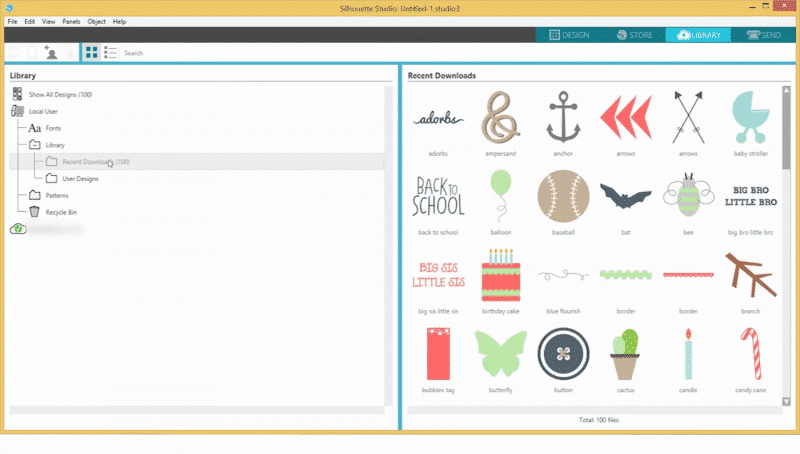
This code also comes with a free 1-month subscription to the Silhouette Design Store. You can search by design, designer, or type of design.
Your Silhouette CAMEO 3 can be used for a lot more than just cutting paper and simple shapes so let’s put it to the test.
Cutting vinyl
Vinyl can be cut with or without a cutting mat. Here I’ll be covering how to load adhesive-backed vinyl without a mat.
Loading the vinyl in
Make sure the rollers are in the proper position. We need to make sure our material is going to be securely grabbed by the CAMEO. This is easy to do:
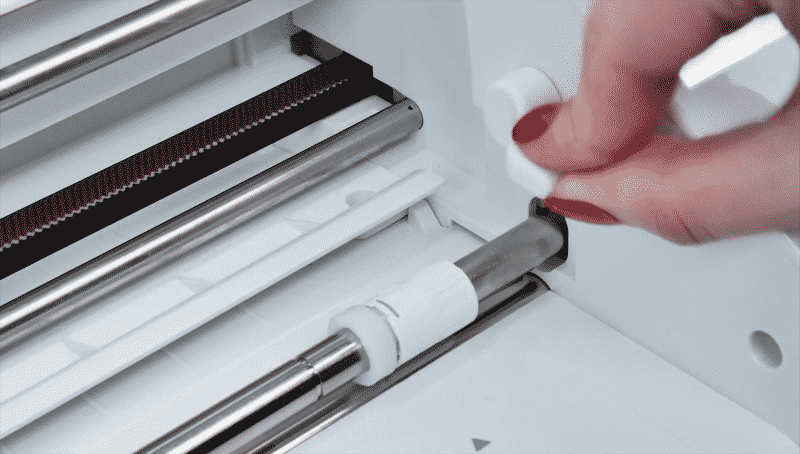
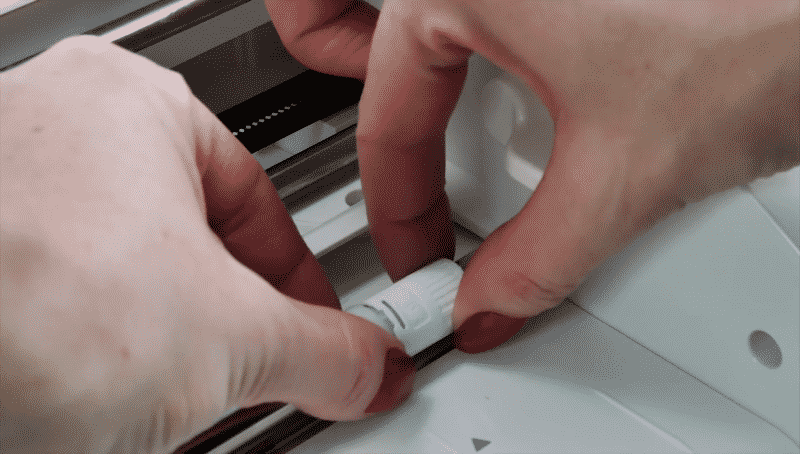
- Unlock the right grip roller by pulling the lock lever down. You can find this lever on the right side of your machine.
- Twist the right grip roller toward you to unlock it and slide it across to the position appropriate for the size of your material. Now twist it away from you to secure it again.
- Re-lock the lock lever by swinging it back up. You can line up your material with blue markings on the left and make sure the right grip roller meets with your material.
- Go to the page set up panel in Silhouette Studio and under the “cutting mat” option select: none.
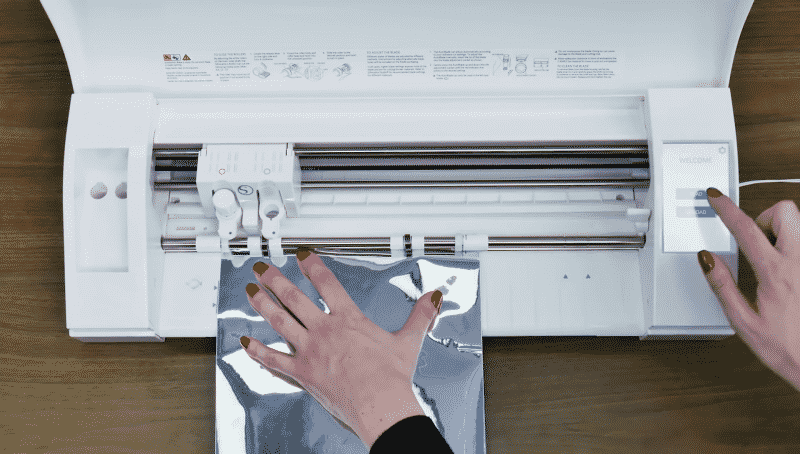
- Holding your vinyl in place, select “load” and your vinyl will be loaded into the Silhouette and ready for cutting.
Cutting text
Okay, let’s try something a bit more fancy than a circle cut: text!
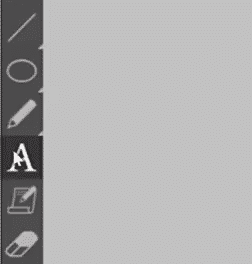
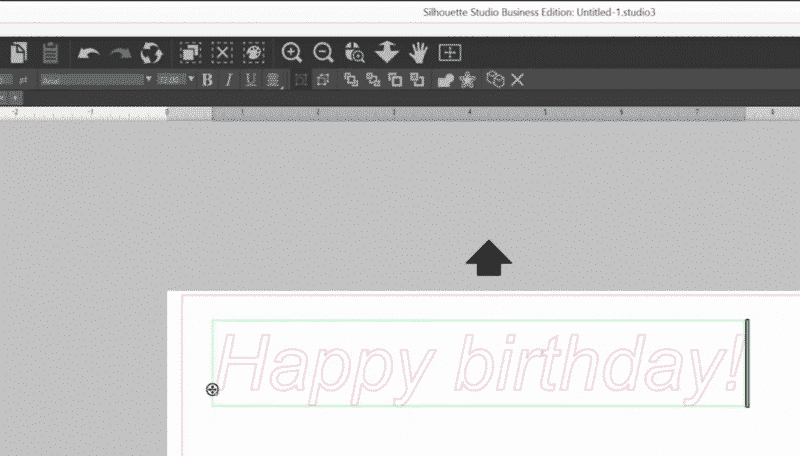
- Select the text tool on the left panel and click in the edit area.
- Start typing any text you want to cut. You can use any font on your computer.
- Once you have it looking how you want it, click on the “send” tab in the upper right corner.
- Change the material type to “vinyl, metallic” and ensure that Action is still set to “cut” and the Tool selected is “AutoBlade.” If you’re using a different type of vinyl, just select it here.
- Hit “send” at the bottom to cut out the design.
- Like before, after the cut is complete select “unload” on the machine’s touch screen.

Beautiful!
One of the nicer features of the CAMEO 3 is the ability to use it without having to plug it into a computer. I absolutely hate a messy workspace, so being able to remove even one cable is priceless for me.
I haven’t used it yet, but you’re also supposed to be able to use an iPad and Silhouette Studio Mobile. If anyone has tried it out, leave me a comment below because I’m super curious about how well it works and how far away you can use it.
Okay, now I’ll walk you through setting up Bluetooth!
Setting up Bluetooth
If the outside of your box reads “Bluetooth included” you can communicate wirelessly to the CAMEO 3. If it instead says “Bluetooth compatible” you’ll have to purchase and install a compatible Bluetooth device.
To set up Bluetooth start by powering on the machine. Select the gear icon in the top right corner of the touchscreen. Scroll down to “Bluetooth” and turn bluetooth “on.”
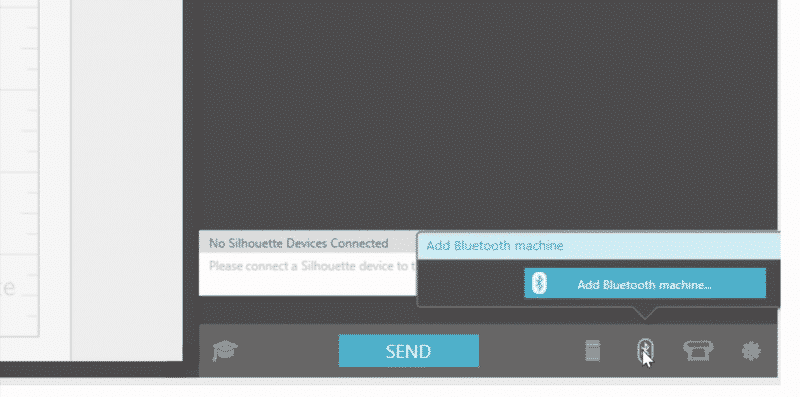
Now go into Silhouette Studio and select the “send” tab in the upper right corner of the screen. In the bottom right corner click on the Bluetooth icon and select “add Bluetooth machine. “After a window pops up, click OK to add the Silhouette CAMEO 3.
If the outside of your box reads “Bluetooth compatible“ you must purchase an adapter and install it. The chip type for the Bluetooth adapter must be: CSR8510 A10. I’ve put together a list of adapters which are compatible with the CAMEO 3. You can find pretty much all of them on Amazon:
- Importer520 Bluetooth 4.0
- DSD TECH Bluetooth USB 4.0
- C-zone Micro USB Bluetooth Adapter
To install, turn the machine over and locate the Bluetooth compartment. Remove the screw and fit the Bluetooth adapter into the slot. Reattach the compartment and close it up. Now you can configure your CAMEO 3 as listed above.
That’s it! You’re ready to start digging in and learning through experimentation! I have a few tricks and tips that I’ve discovered through trial and error and an FAQ of the more common questions and issues people have with the Silhouette CAMEO 3.
What’s next? Do a little dance! Then take some time to browse the Silhouette Studio store for some inspiration.
Or: check out my favorite list of free SVG cut files that you can download right now and use! If you don’t know what an SVG file is, you’re in for a treat. Definitely check out that list because it’ll be life-changing.
Now that you’ve made your first few projects it’ll be much easier in the future and you can start playing around and experimenting, that’s how I learn best.
Tricks and tips
- You’ll notice that Silhouette Studio gives you the exact dimensions of the shape you’re cutting out. By clicking on the shape with the Select tool you can actually specify those dimensions yourself numerically!
- To figure out what a specific tool does in Silhouette Studio, just hover your cursor over it. After a few moments, a tooltip will pop up with a brief description of the tool.
- To see exactly where on the cutting mat grid your object will be placed, you can select the “page setup panel” on the right. Show/hide the cutting mat by clicking and dragging the “Reveal” slider bar.
- Make sure your material is always lined up on the left side of your machine. There are blue lines on the CAMEO 3 or red on the CAMEO 2.
- If you purchase Silhouette Studio Designer Edition you can import in free SVG graphics (I have a huge collection of them available).
- If your blade isn’t cutting properly try poking inside with a pin to dislodge any paper or vinyl which might have accumulated.
- Take the time to really secure your material to the cutting mat.
- Try a test cut. If you have expensive material you might need to take a few tries to calibrate the settings just right. Before ruining that material you can plan out a very small cut on the edge to make sure the settings are correct.
- Check the position of your rollers. If you’re cutting a variety of material or sizes of mats you’ll find yourself adjusting them quite often. Make sure your cutting mat size is correctly set when making these adjustments. Always select “none” if you are loading your material in (like vinyl sheets) without a mat.
- For more information, explore the manuals! They have a wealth of detail and cover the most common issues and projects that might come up.
FAQ
Should I buy the Silhouette Cameo 3 or the Cricut Explore Air 2?
I have a review called “Silhouette Cameo 3 vs Cricut Explore Air 2” which I wrote to answer this very question. Short answer: both are great!
Do you have a review of the Silhouette Cameo 4?
I just reviewed it in September, 2020.
How many computers can I use the Silhouette with? Can I install the software on each of them?
You can download the software on as many computers as you like, Silhouette Cloud will let you sync with up to 5 at a time.
My Silhouette CAMEO 3 isn’t cutting in the right place.
The most common issue is that you’re not using a cutting mat or your cutting mat isn’t gripping properly. See if using a different cutting mat or material fixes the issue.
I don’t see grid marks on my welcome screen.
Go to the menu at the top, click View and then Show Grid.
I’ve selected the type tool but I can’t get any text to appear in the design area.
Make sure after clicking on the type tool to click on the design area where you want your text to appear. After you type it out you can go ahead and switch to the selection tool to adjust its placement, size, and dimensions!





Thank you for sharing
You’re welcome! I’m happy to help 🙂
I have just purchased a cameo 3 and currently setting it up… I have started a balloon business from home and have bought it to personalise my balloons. My first order is on Saturday so I am making sure it all works and more importantly I know what I am doing!!!! I am a little nervous… I’m sure its one of those things that seems so simple once you have done it a few times!! so… wish me luck!
And thank you for your tutorial! its really helped me a lot!
I’ll be using my new purchased cameo 3 for scrapbooking and for wedding invitations but still don’t know how to start yet. Please help me out. How can I cut laser cut patterns for invitations?
Your tutorial is great. You wouldn’t by chance know why I can’t see anything on my design screen, but if I hit send I can see the design on that screen? Its been plaguing me since day one:(
I bought this two years ago and kept getting stuck on pause when I print would not come out for months finally got some new start up downloaded just started using it again just headed over to New Year’s very flustered rated no help from anybody sometimes I just want to throw it. Silhouette really needs the help line I will never recommend this to anybody
I bought this two years ago and kept getting stuck on pause when I print would not come out for months finally got some new start up downloaded just started using it again today. Very flustered no help from anybody sometimes I just want to throw it. Silhouette really needs the help line I will never recommend this to anybody